
Step by step guide to setup and configure Cordova for iOS and Android to load a hosted React app
How RYSE used Cordova to deliver a continuous, cross platform, native experience

RYSE App mobile development stack as icons. Highlighted icons are Cordova, Android, iOS, React.
At RYSE, we initially decided to write our app as a web-based React app for a few reasons:
familiarity
continuous and faster delivery without app store approvals required
getting in front of users without solidifying everything needed to submit to an App store
RYSE is a social fitness app — so as we started to get users, we quickly realized that we wouldn’t be able to deliver on the social aspects of our product without a mobile app. Things like push notifications and easy access to the app on the home screen are a necessity as we are primarily focused on users interacting with the app on their mobile devices.
We really enjoyed both the speed of development and the ability to deliver continuously that comes with building in the web, so we decided to look into Apache Cordova as a solution to wrap our web app with native functionality rather than rewriting our application in something like React Native.
Cordova ultimately satisfied these key requirements
Push Notifications
App with a native capabilities and a native look and feel
Cross platform — write once, deploy to web, Android, and iOS
Embed a hosted web application to enable continuous delivery without resubmitting to app store
Injectable JavaScript to access native functionality through Cordova from our hosted application
Bonus: we didn’t have to rewrite our application and stumble through unknown React Native hurdles
We were very pleased with our experience in using Cordova, but our setup was not the typical Cordova use case, so we ran into some speed bumps along the way.
That’s why we’re writing this article! Hopefully the step by step guide below will help you set up and configure Cordova and even expand on it for your own use case!
Step by step guide to embedding a hosted React app in Cordova for Android and iOS
The code for this guide exists at https://github.com/altrulife/cordova-create-react-app-example. You can see our example setup there and the commits are ordered so that you can peak into each commit and see exactly what changes were made for each step.
This guide aims to walk you through solving the following requirements
Ability to build and deploy a web app separately from the Cordova shell
Build a native Cordova app shell for Android and iOS that loads the hosted web app
Inject JavaScript into web app so it can interact with the Cordova app and expose native functionality
Generate and configure icons, splash screens, permissions, and preferences and make some patches to some packages so that we’re ready for App store submission
Technologies used
Apache Cordova
Create React App
cordova-plugin-whitelist (so our native Cordova app can only load URLs specified)
cordova-plugin-remote-injection (inject Cordova javascript into Hosted remote app to access native functionality)
cordova-plugin-splashscreen
patch-package (to slightly adjust some Cordova packages so can upload to App Store)
Step 1 — Initial Create React App and Cordova Setup
To get started, use Create React App to generate an example application.
npx create-react-app cordova-create-react-app-example --template typescript
cd cordova-create-react-app-example
Create a Cordova app shell.
npx cordova create cordova io.ryseapp.ryse Ryse
note: “Ryse” is YOUR app name “io.ryseapp.ryse” is typically YOUR domain reversed with the app name appended
Step 2— Setup Cordova to be able to run on iOS and Android Emulators
Install cordova as a devDependency so that your teammates won’t need to have it installed globally.
cd cordova
npm install cordova -D
Add to the scripts field in your cordova package.json so that we can run cordova commands with npm
  "scripts": {
    "cordova": "cordova"
  },
Add iOS and Android platforms — this generates code in cordova/platforms that you should NOT modify.
npm run cordova platform add ios
npm run cordova platform add android
Prerequisites for building Cordova app
For iOS:
The steps below are from https://cordova.apache.org/docs/en/10.x/guide/platforms/ios/index.html
Download XCode from App Store and run these commands in a terminal
xcode-select --install
brew install ios-deploy
sudo gem install cocoapods
If you have a new Mac with an M1 chip, you may need to also run
sudo arch -x86_64 gem install ffi
For Android
The steps below are from https://cordova.apache.org/docs/en/10.x/guide/platforms/android/index.html
Download Android Studio and run through setup wizard
Add JAVA_HOME and ANDROID_SDK_ROOT environment variables to your PATH
Find Java SDK with command /usr/libexec/java_home -V | grep jdk and it should look something like /Library/Java/JavaVirtualMachines/jdk1.8.0_281.jdk/Contents/Home.
example for ~/.zshrc (be sure to “source ~/.zshrc” after adding exports)
...

export ANDROID_SDK_ROOT=/Users/bryanhunter/Library/Android/sdk
export PATH=\${PATH}:/Users/bryanhunter/Library/Android/sdk/tools:/Users/bryanhunter/Library/Android/sdk/tools/bin:/Users/bryanhunter/Library/Android/sdk/platform-tools
export JAVA_HOME=/Library/Java/JavaVirtualMachines/jdk1.8.0_281.jdk/Contents/Home
export PATH=$JAVA_HOME/bin:$PATH

...
Android emulator — if you have a new Mac with an M1 chip
have at least Android SDK version 4.1.3.
To install from Android Studio: Tools -> AVD Manager -> Create Virtual Device -> Pixel4 (with Google Play symbol) -> Next -> Select System Image / Other Images / Release S with ABI arm64-v8a
note: you may have to start the emulator twice for it to work
Verify that “cordova run” works for iOS and Android
npm run cordova run ios

Start your Android Emulator first and run
npm run cordova run android

Step 3— Run your React app and load it inside of Cordova
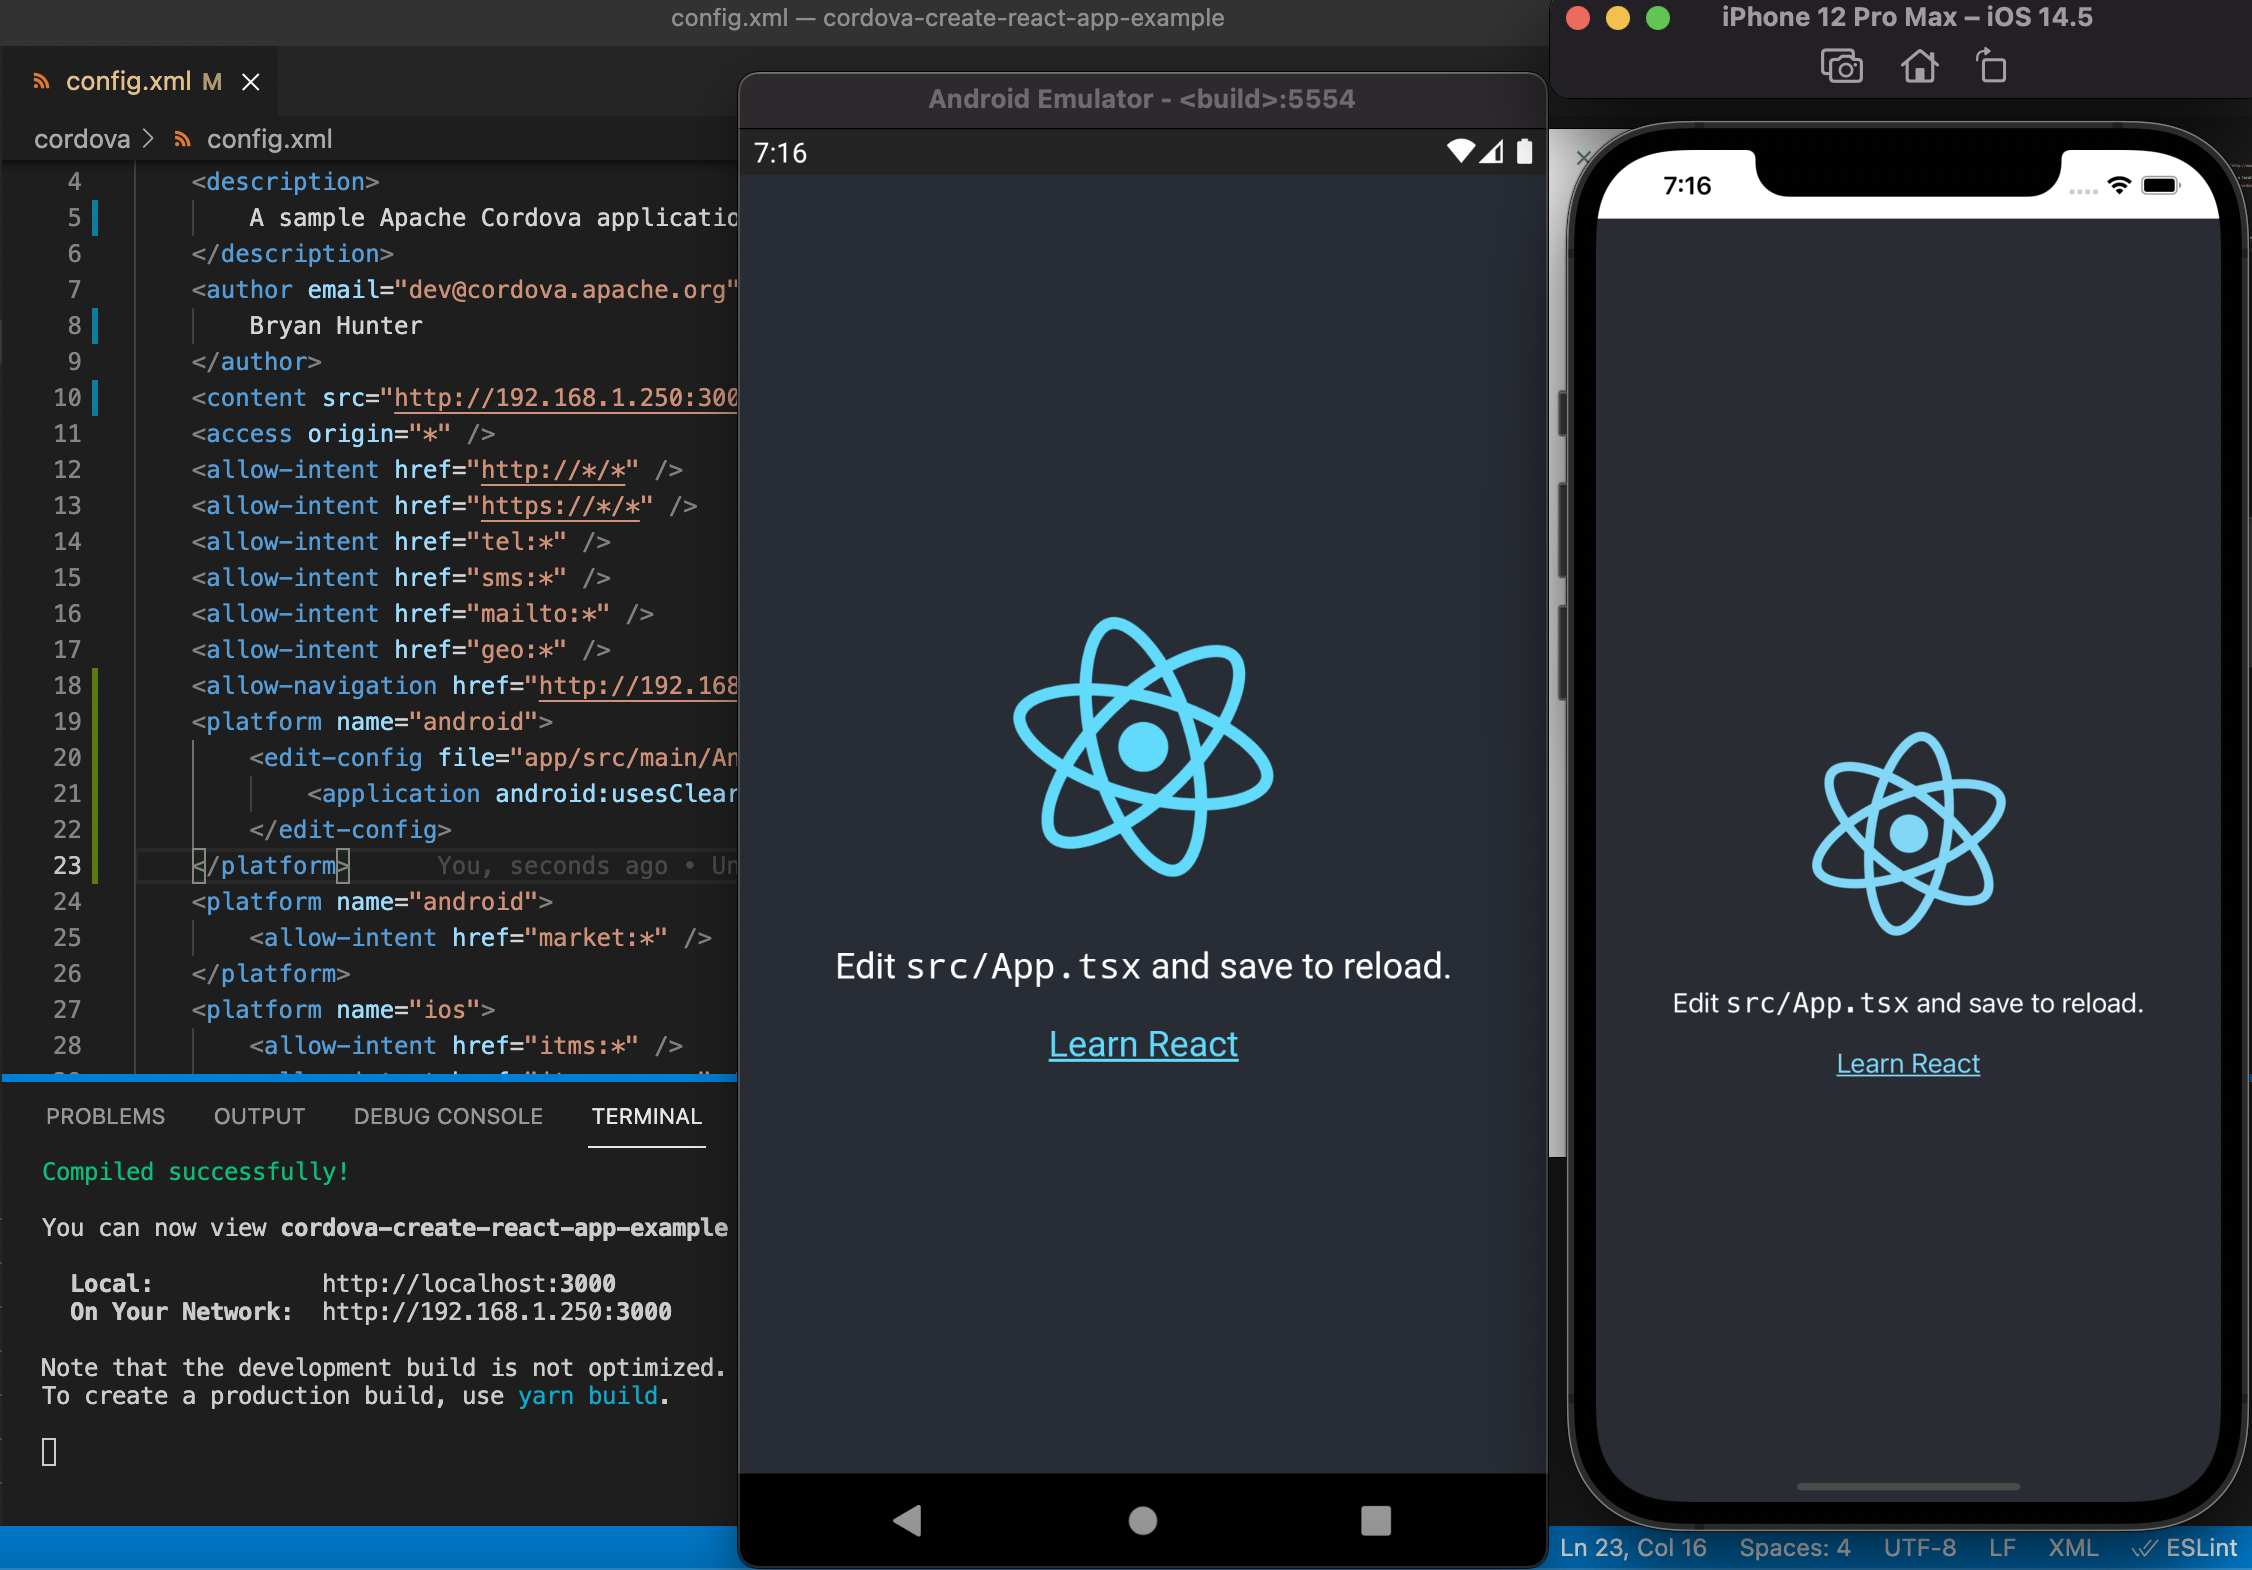
Modify cordova/config.xml with the following — be sure to change the address (http://192.168.1.250:3000) to wherever you are hosting your app.
...
<widget id="io.ryseapp.ryse" version="1.0.0" xmlns="http://www.w3.org/ns/widgets" xmlns:cdv="http://cordova.apache.org/ns/1.0" xmlns:android="http://schemas.android.com/apk/res/android">

  ...

  <content src="http://192.168.1.250:3000" />
  <allow-navigation href="http://192.168.1.250:3000/*" />
  <platform name="android">
    <edit-config file="app/src/main/AndroidManifest.xml" mode="merge" target="/manifest/application">
      <application android:usesCleartextTraffic="true" />
    </edit-config>
  </platform>

  ...

</widget>
note: We can remove everything under the `www` folder, because we’re loading a hosted app and not a bundled one. However, Cordova still requires a `www` folder to exist to run, so I just create a file named `_cordova-requires-www-folder-to-start` to avoid confusion.
Start your React app
Navigate to app root directory and
yarn start
Run Cordova on iOS and Android in another terminal
cd cordova
npm run cordova run ios
npm run cordova run android
Modify your React app public/index.html so that it looks and feels native instead of in a nested browser
<!DOCTYPE html> <html lang="en"> <meta name="viewport" content="initial-scale=1, maximum-scale=1.0, height=device-height, width=device-width, viewport-fit=cover, user-scalable=no"> <style> html { border: 0; margin: 0; padding:0px; width: 100%; /* has to be vh and not % for IOS to fill entire phone screen */ height: 100vh; overflow: hidden; } body { border: 0; margin: 0; padding:0px; /* Padding to avoid the "unsafe" areas behind notches in the screen */ padding: env(safe-area-inset-top, 0px) env(safe-area-inset-right, 0px) env(safe-area-inset-bottom, 0px) env(safe-area-inset-left, 0px); position: fixed; width: 100%; height: 100%; overflow: hidden; display: flex; flex-direction: column; } * { box-sizing: border-box; } </style> <div id="root" style="height: 100%; width: 100%;"></div>
Step 4— Add cordova-plugin-remote-injection and verify React app can access Cordova
Temporarily add this to your React public/index.html
<script> document.addEventListener('deviceready', () => alert('it works!'), false);</script>
You can verify that this ALERT does NOT display before you add the plugin.
Add the cordova-plugin-remote-injection plugin to your Cordova app.
npm run cordova plugin add cordova-plugin-remote-injection
Start your React app and run Cordova to verify access to injected Cordova javascript on React app
yarn start
...
npm run cordova run ios

Don’t forget to remove the <script> document.addEventListener(‘deviceready’, () => alert(‘it works!’), false);</script> from public/index.html because we were just using that to test
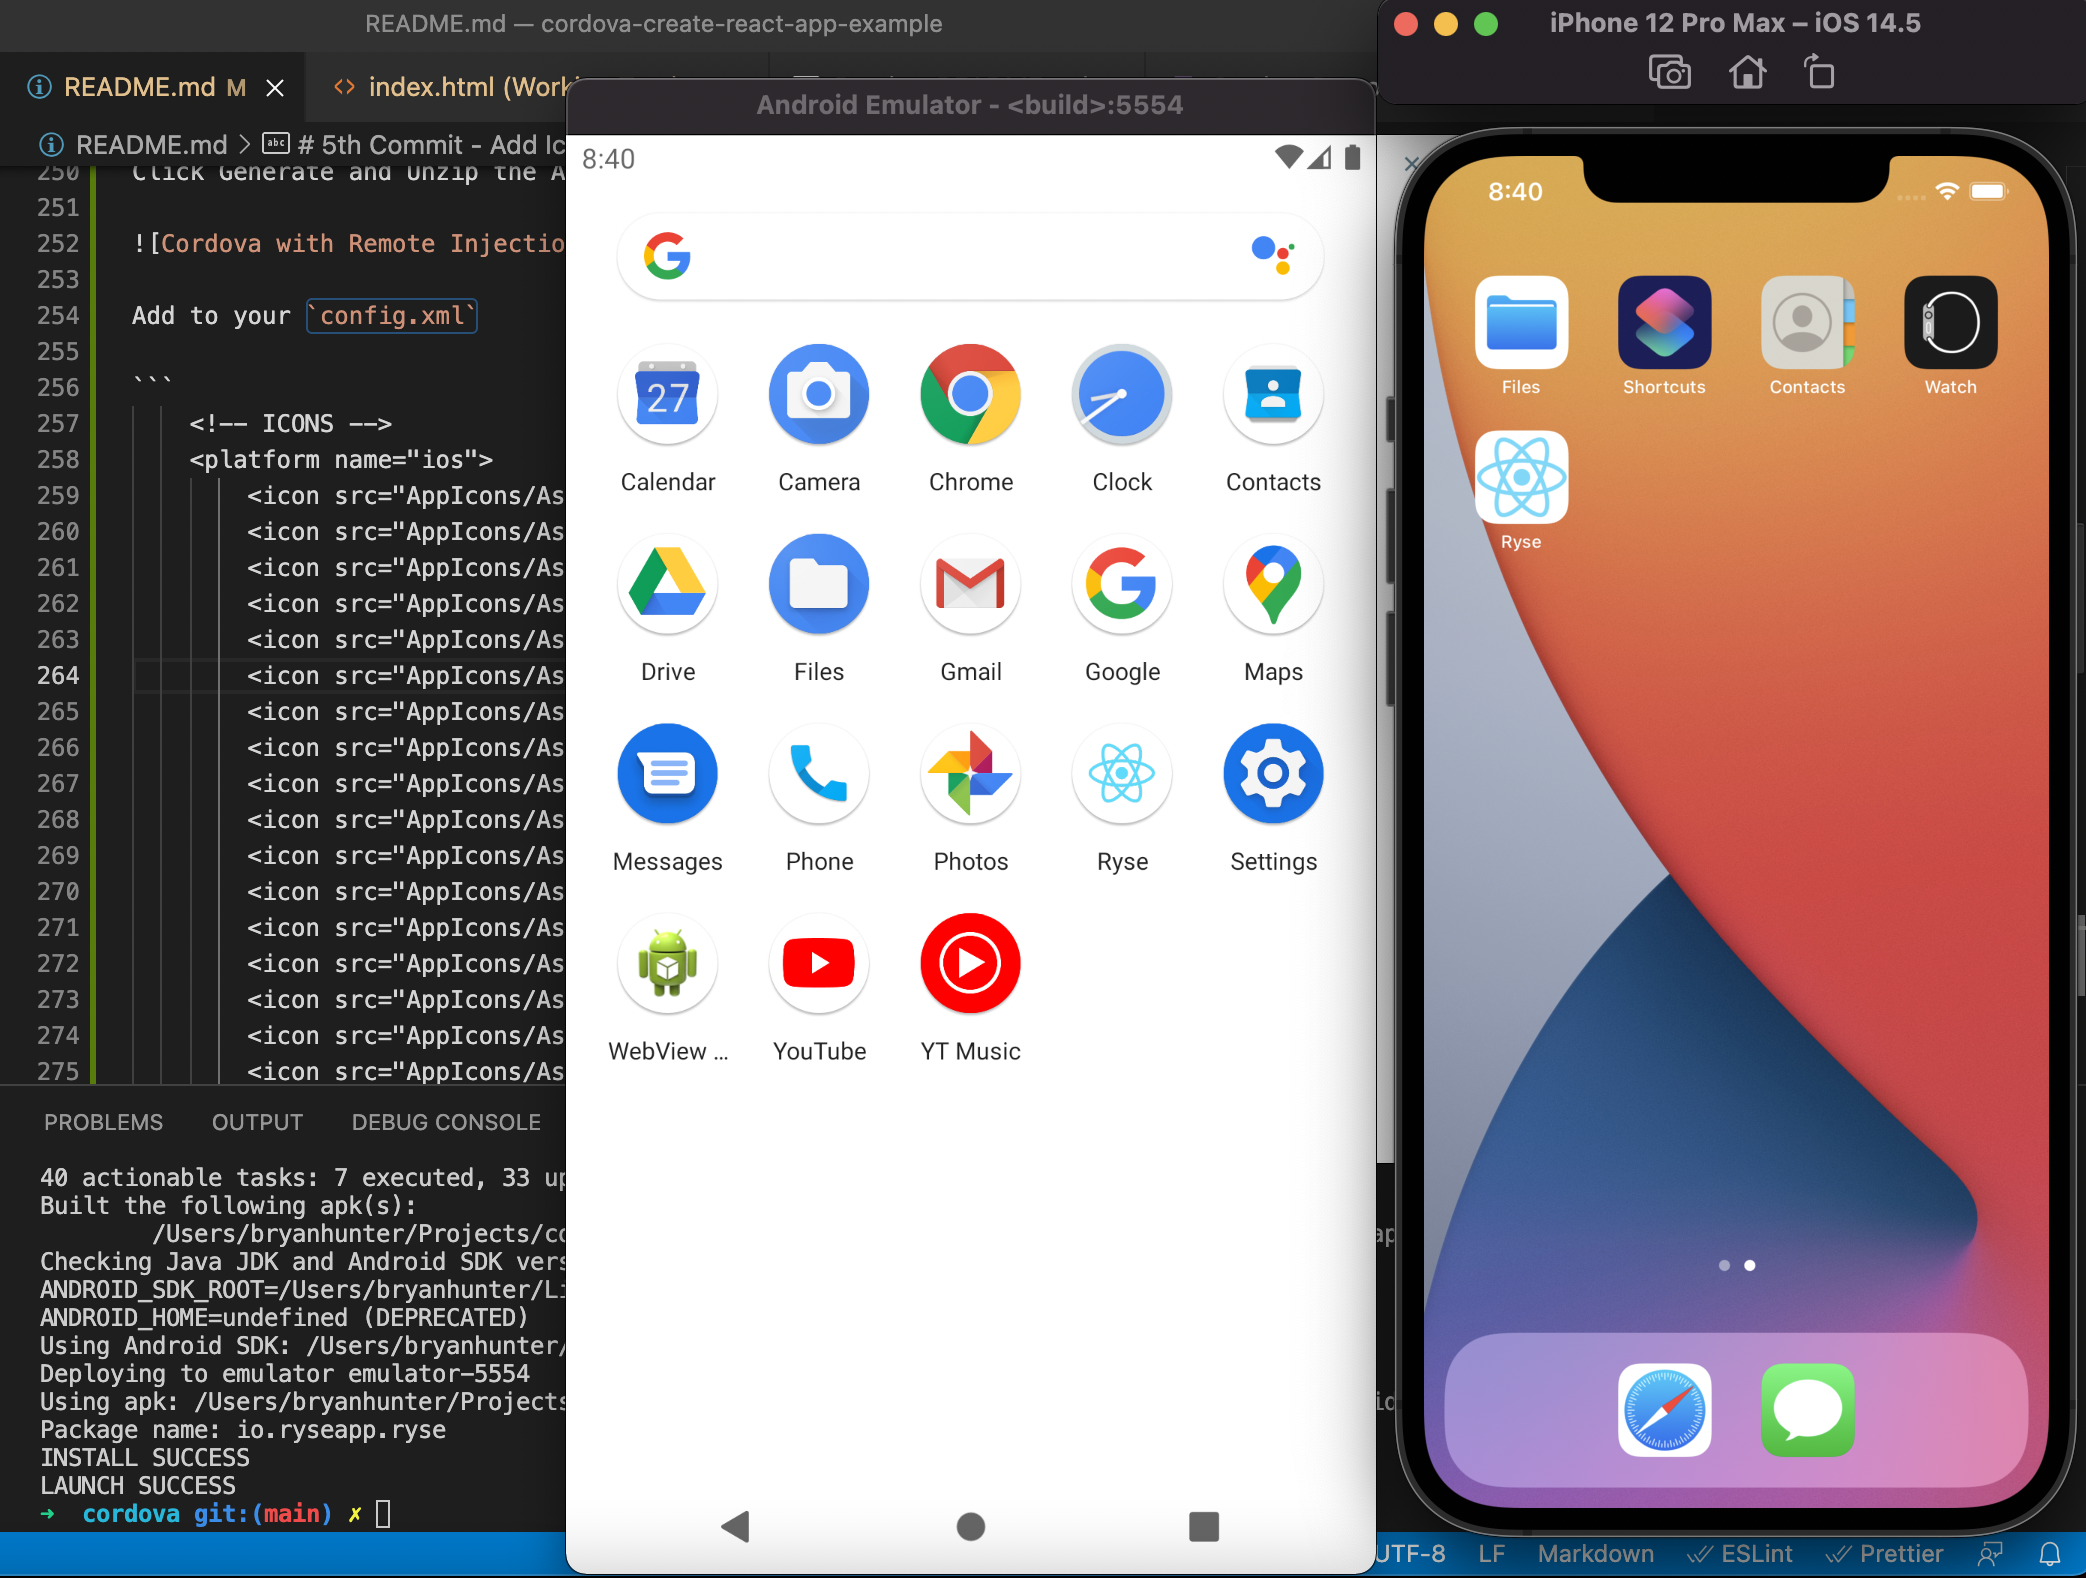
Step 5— Add icons for iOS and Android
Use https://appicon.co/ to Upload your icon (public/logo512.png for the default Create React App).
Click Generate and Unzip the AppIcons folder and move it under your /cordova folder

Add the icons to your Cordova config.xml
...
    <!-- ICONS -->
    <platform name="ios">
        <icon src="AppIcons/Assets.xcassets/AppIcon.appiconset/16.png" width="16" height="16" />
        <icon src="AppIcons/Assets.xcassets/AppIcon.appiconset/20.png" width="20" height="20" />
        <icon src="AppIcons/Assets.xcassets/AppIcon.appiconset/29.png" width="29" height="29" />
        <icon src="AppIcons/Assets.xcassets/AppIcon.appiconset/32.png" width="32" height="32" />
        <icon src="AppIcons/Assets.xcassets/AppIcon.appiconset/40.png" width="40" height="40" />
        <icon src="AppIcons/Assets.xcassets/AppIcon.appiconset/48.png" width="48" height="48" />
        <icon src="AppIcons/Assets.xcassets/AppIcon.appiconset/50.png" width="50" height="50" />
        <icon src="AppIcons/Assets.xcassets/AppIcon.appiconset/55.png" width="55" height="55" />
        <icon src="AppIcons/Assets.xcassets/AppIcon.appiconset/57.png" width="57" height="57" />
        <icon src="AppIcons/Assets.xcassets/AppIcon.appiconset/58.png" width="58" height="58" />
        <icon src="AppIcons/Assets.xcassets/AppIcon.appiconset/60.png" width="60" height="60" />
        <icon src="AppIcons/Assets.xcassets/AppIcon.appiconset/64.png" width="64" height="64" />
        <icon src="AppIcons/Assets.xcassets/AppIcon.appiconset/72.png" width="72" height="72" />
        <icon src="AppIcons/Assets.xcassets/AppIcon.appiconset/76.png" width="76" height="76" />
        <icon src="AppIcons/Assets.xcassets/AppIcon.appiconset/80.png" width="80" height="80" />
        <icon src="AppIcons/Assets.xcassets/AppIcon.appiconset/87.png" width="87" height="87" />
        <icon src="AppIcons/Assets.xcassets/AppIcon.appiconset/88.png" width="88" height="88" />
        <icon src="AppIcons/Assets.xcassets/AppIcon.appiconset/100.png" width="100" height="100" />
        <icon src="AppIcons/Assets.xcassets/AppIcon.appiconset/114.png" width="114" height="114" />
        <icon src="AppIcons/Assets.xcassets/AppIcon.appiconset/120.png" width="120" height="120" />
        <icon src="AppIcons/Assets.xcassets/AppIcon.appiconset/128.png" width="128" height="128" />
        <icon src="AppIcons/Assets.xcassets/AppIcon.appiconset/144.png" width="144" height="144" />
        <icon src="AppIcons/Assets.xcassets/AppIcon.appiconset/152.png" width="152" height="152" />
        <icon src="AppIcons/Assets.xcassets/AppIcon.appiconset/167.png" width="167" height="167" />
        <icon src="AppIcons/Assets.xcassets/AppIcon.appiconset/172.png" width="172" height="172" />
        <icon src="AppIcons/Assets.xcassets/AppIcon.appiconset/180.png" width="180" height="180" />
        <icon src="AppIcons/Assets.xcassets/AppIcon.appiconset/196.png" width="196" height="196" />
        <icon src="AppIcons/Assets.xcassets/AppIcon.appiconset/216.png" width="216" height="216" />
        <icon src="AppIcons/Assets.xcassets/AppIcon.appiconset/256.png" width="256" height="256" />
        <icon src="AppIcons/Assets.xcassets/AppIcon.appiconset/512.png" width="512" height="512" />
        <icon src="AppIcons/Assets.xcassets/AppIcon.appiconset/1024.png" width="1024" height="1024" />
    </platform>
    <platform name="android">
        <icon src="AppIcons/android/mipmap-mdpi/ic_launcher.png" density="mdpi" />
        <icon src="AppIcons/android/mipmap-hdpi/ic_launcher.png" density="hdpi" />
        <icon src="AppIcons/android/mipmap-xhdpi/ic_launcher.png" density="xhdpi" />
        <icon src="AppIcons/android/mipmap-xxhdpi/ic_launcher.png" density="xxhdpi" />
        <icon src="AppIcons/android/mipmap-xxxhdpi/ic_launcher.png" density="xxxhdpi" />
    </platform>
...
Verify that the icons are displayed on both Android and iOS
Step 6— Add Splash Screens for iOS and Android
npm run cordova plugin add cordova-plugin-splashscreen
For both Android and iOS, you typically want your Splash Screen image to be centered and the main contents of the image to not be anywhere near the edges so that it doesn’t accidentally get clipped.
For Android, you need PNGs of size:
300x300 — mdpi
450x450 — hdpi
600x600 — xhdpi
900x900 — xxhdpi
1200x1200 — xxxhdpi
For iOS, you can use a single universal image of size:
2732x2732 — universal
You can set the SplashScreen delay, we chose 3 seconds to give the React app a little bit of time to load before displaying it.
Add to your Cordova config.xml
...
    <!-- SPLASH SCREENS -->
    <platform name="android">
        <splash src="SplashScreens/android/port-hdpi.png" density="hdpi"/>
        <splash src="SplashScreens/android/port-mdpi.png" density="mdpi"/>
        <splash src="SplashScreens/android/port-xhdpi.png" density="xhdpi"/>
        <splash src="SplashScreens/android/port-xxhdpi.png" density="xxhdpi"/>
        <splash src="SplashScreens/android/port-xxxhdpi.png" density="xxxhdpi"/>
    </platform>
    <platform name="ios">
        <splash src="SplashScreens/ios/Default@2x~universal~anyany.png" />
    </platform>
    <preference name="SplashScreenDelay" value="3000" />
...
Verify the SplashScreens on Android and iOS

Step 7— Add permissions, preferences, and patch cordova-ios and cordova-plugin-remote-injection to allow upload to App store
One risk with using Cordova is that the App Store or Play Store can suddenly refuse your app for certain security or deprecation reasons.
Because of this, we had to use the patch-package library to add and remove some code from cordova-ios and cordova-plugin-remote-injection libraries. Some of these libraries are no longer maintained or don’t fit our exact use case, so we had to patch them ourselves.
Install patch-package in our /cordova folder
npm install patch-package -D
add postinstall to scripts in cordova/package.json
 "scripts": {
    "cordova": "cordova",
    "postinstall": "patch-package"
  },
Patch cordova-ios to include limitsNavigationsToAppBoundDomains
Normally, we would modify the cordova-ios package in node_modules and then run patch-package to generate a patch file for us, but I have already done this and this is the generated patch file:
Make a /patches directory under /cordova and add cordova-ios+6.2.0.patch file to it
diff --git a/node_modules/cordova-ios/CordovaLib/Classes/Private/Plugins/CDVWebViewEngine/CDVWebViewEngine.m b/node_modules/cordova-ios/CordovaLib/Classes/Private/Plugins/CDVWebViewEngine/CDVWebViewEngine.m
index a07bf29..5a378ea 100644
--- a/node_modules/cordova-ios/CordovaLib/Classes/Private/Plugins/CDVWebViewEngine/CDVWebViewEngine.m
+++ b/node_modules/cordova-ios/CordovaLib/Classes/Private/Plugins/CDVWebViewEngine/CDVWebViewEngine.m
@@ -73,6 +73,7 @@
 {
     WKWebViewConfiguration* configuration = [[WKWebViewConfiguration alloc] init];
     configuration.processPool = [[CDVWebViewProcessPoolFactory sharedFactory] sharedProcessPool];
+    configuration.limitsNavigationsToAppBoundDomains = [settings cordovaBoolSettingForKey:@"LimitsNavigationsToAppBoundDomains" defaultValue:NO];
     if (settings == nil) {
         return configuration;
     }
Patch cordova-plugin-remote-injection to remove deprecated UIWebView references
Under cordova/patches directory add cordova-plugin-remote-injection+0.5.2.patch file
diff --git a/node_modules/cordova-plugin-remote-injection/plugin.xml b/node_modules/cordova-plugin-remote-injection/plugin.xml
index 9c79964..7164046 100644
--- a/node_modules/cordova-plugin-remote-injection/plugin.xml
+++ b/node_modules/cordova-plugin-remote-injection/plugin.xml
@@ -18,8 +18,6 @@
     <source-file src="src/ios/CDVRemoteInjection.m" />
     <header-file src="src/ios/CDVRemoteInjectionWebViewBaseDelegate.h" />
     <source-file src="src/ios/CDVRemoteInjectionWebViewBaseDelegate.m" />
-    <header-file src="src/ios/CDVRemoteInjectionUIWebViewDelegate.h" />
-    <source-file src="src/ios/CDVRemoteInjectionUIWebViewDelegate.m" />
     <header-file src="src/ios/CDVRemoteInjectionWKWebViewDelegate.h" />
     <source-file src="src/ios/CDVRemoteInjectionWKWebViewDelegate.m" />
   </platform>
diff --git a/node_modules/cordova-plugin-remote-injection/src/ios/CDVRemoteInjection.m b/node_modules/cordova-plugin-remote-injection/src/ios/CDVRemoteInjection.m
index 9c11eb9..e152d3b 100644
--- a/node_modules/cordova-plugin-remote-injection/src/ios/CDVRemoteInjection.m
+++ b/node_modules/cordova-plugin-remote-injection/src/ios/CDVRemoteInjection.m
@@ -6,7 +6,6 @@
 #import <WebKit/WebKit.h>

 #import "CDVRemoteInjection.h"
-#import "CDVRemoteInjectionUIWebViewDelegate.h"
 #import "CDVRemoteInjectionWKWebViewDelegate.h"

 @implementation CDVRemoteInjectionPlugin {
@@ -81,13 +80,7 @@
     }

     id webView = [self findWebView];
-    if ([webView isKindOfClass:[UIWebView class]]) {
-        NSLog(@"Found UIWebView");
-        webViewDelegate = [[CDVRemoteInjectionUIWebViewDelegate alloc] init];
-        [webViewDelegate initializeDelegate:self];
-
-        return;
-    } else if ([webView isKindOfClass:[WKWebView class]]) {
+    if ([webView isKindOfClass:[WKWebView class]]) {
         NSLog(@"Found WKWebView");
         webViewDelegate = [[CDVRemoteInjectionWKWebViewDelegate alloc] init];
         [webViewDelegate initializeDelegate:self];
diff --git a/node_modules/cordova-plugin-remote-injection/src/ios/CDVRemoteInjectionUIWebViewDelegate.h b/node_modules/cordova-plugin-remote-injection/src/ios/CDVRemoteInjectionUIWebViewDelegate.h
deleted file mode 100644
index b451824..0000000
--- a/node_modules/cordova-plugin-remote-injection/src/ios/CDVRemoteInjectionUIWebViewDelegate.h
+++ /dev/null
@@ -1,13 +0,0 @@
-#import "CDVRemoteInjection.h"
-#import "CDVRemoteInjectionWebViewBaseDelegate.h"
-
-@interface CDVRemoteInjectionUIWebViewDelegate: CDVRemoteInjectionWebViewBaseDelegate <CDVRemoteInjectionWebViewDelegate>
-@property (readwrite, weak) CDVRemoteInjectionPlugin *plugin;
-- (void) onWebViewDidStartLoad;
-- (void) onWebViewDidFinishLoad:(UIWebView *)webView;
-- (void) onWebViewFailLoadWithError:(NSError *)error;
-@end
-
-@interface CDVRemoteInjectionUIWebViewNotificationDelegate : WrappedDelegateProxy <UIWebViewDelegate>
-@property (readwrite, weak) CDVRemoteInjectionUIWebViewDelegate *webViewDelegate;
-@end
diff --git a/node_modules/cordova-plugin-remote-injection/src/ios/CDVRemoteInjectionUIWebViewDelegate.m b/node_modules/cordova-plugin-remote-injection/src/ios/CDVRemoteInjectionUIWebViewDelegate.m
deleted file mode 100644
index bb0251e..0000000
--- a/node_modules/cordova-plugin-remote-injection/src/ios/CDVRemoteInjectionUIWebViewDelegate.m
+++ /dev/null
@@ -1,100 +0,0 @@
-//
-//  CDVRemoteInjection.m
-//
-
-#import <Foundation/Foundation.h>
-
-#import "CDVRemoteInjectionUIWebViewDelegate.h"
-#import "CDVRemoteInjectionWebViewBaseDelegate.h"
-
-
-@implementation CDVRemoteInjectionUIWebViewNotificationDelegate
-@dynamic wrappedDelegate;
-
-- (void)webViewDidStartLoad:(UIWebView*)webView
-{
-    [self.webViewDelegate onWebViewDidStartLoad];
-
-    if ([self.wrappedDelegate respondsToSelector:@selector(webViewDidStartLoad:)]) {
-        [self.wrappedDelegate webViewDidStartLoad:webView];
-    }
-}
-
-- (void)webViewDidFinishLoad:(UIWebView *)webView
-{
-    [self.webViewDelegate onWebViewDidFinishLoad:webView];
-
-    if ([self.wrappedDelegate respondsToSelector:@selector(webViewDidFinishLoad:)]) {
-        [self.wrappedDelegate webViewDidFinishLoad:webView];
-    }
-}
-
-- (void)webView:(UIWebView *)webView didFailLoadWithError:(NSError *)error
-{
-    if ([self.wrappedDelegate respondsToSelector:@selector(webView:didFailLoadWithError:)]) {
-        [self.wrappedDelegate webView:webView didFailLoadWithError:error];
-    }
-
-    [self.webViewDelegate onWebViewFailLoadWithError:error];
-}
-@end
-
-@implementation CDVRemoteInjectionUIWebViewDelegate
-{
-    CDVRemoteInjectionUIWebViewNotificationDelegate *notificationDelegate;
-}
-
-- (void)initializeDelegate:(CDVRemoteInjectionPlugin *)plugin
-{
-    self.plugin = plugin;
-
-    // Wrap the current delegate with our own so we can hook into web view events.
-    UIWebView *uiWebView = [plugin findWebView];
-    notificationDelegate = [[CDVRemoteInjectionUIWebViewNotificationDelegate alloc] init];
-    notificationDelegate.wrappedDelegate = [uiWebView delegate];
-    notificationDelegate.webViewDelegate = self;
-    [uiWebView setDelegate:notificationDelegate];
-}
-
--(void) onWebViewDidStartLoad
-{
-    [super webViewRequestStart];
-}
-
-/*
- * After page load inject cordova and its plugins.
- */
-- (void) onWebViewDidFinishLoad:(UIWebView *)webView
-{
-    // Cancel the slow request timer.
-    [self cancelRequestTimer];
-
-    // Inject cordova into the page.
-    NSString *scheme = webView.request.URL.scheme;
-
-    if ([self isSupportedURLScheme:scheme]){
-        [webView stringByEvaluatingJavaScriptFromString:[self buildInjectionJS]];
-    }
-}
-
-// Handles notifications from the webview delegate whenever a page load fails.
-- (void) onWebViewFailLoadWithError:(NSError *)error
-{
-    [self loadPageFailure:error];
-}
-
-- (BOOL) isLoading
-{
-    UIWebView *uiWebView = [self.plugin findWebView];
-    return uiWebView.loading;
-}
-
-- (void) retryCurrentRequest
-{
-    UIWebView *webView = [self.plugin findWebView];
-
-    [webView stopLoading];
-    [webView reload];
-}
-
-@end
We are now using Cordova in a slightly non-standard way, so we’ll have to remove the Android and iOS platforms temporarily. This is so we can manage the cordova-ios library install as part of npm in the package.json instead of through adding ios as a platform. This gives us the ability to patch-package as part of postinstall. This is a one time process that other developers won’t have to worry about because they will always npm install and then add the platforms when they go to set up their local environment
npm run cordova platform remove ios
npm run cordova platform remove android
Add cordova-ios and cordova-android to devDependencies before re-adding ios and android so that we can patch-package cordova-ios
"devDependencies": {
  "cordova": "^10.0.0",
  "cordova-android": "^9.0.0",
  "cordova-ios": "^6.2.0",
  "cordova-plugin-remote-injection": "^0.5.2",
  "cordova-plugin-splashscreen": "^6.0.0",
  "cordova-plugin-whitelist": "^1.3.4",
  "patch-package": "^6.4.7"
},
Run npm install so that patch-package will be run before we add ios and android platforms.
npm install
npm run cordova platform add ios
npm run cordova platform add android
Update your Cordova config.xml with some preferences and permissions
Allow swipe and back buttons to navigate in mobile browsers for iOS and Android
Restrict which domains we can load in the mobile browser
Add some other common permissions you’ll likely use in your app if you’re going mobile
...
    <preference name="AllowBackForwardNavigationGestures" value="true" />

    <!-- IOS App Bound Domains -->
    <platform name="ios">
        <config-file target="*-Info.plist" parent="WKAppBoundDomains">
            <array>
                <!-- <string>{YOUR_DOMAIN}</string> -->
                <!-- <string>auth.{YOUR_DOMAIN}</string> -->
                <string>http://192.168.1.250:3000</string>
            </array>
        </config-file>
        <preference name="LimitsNavigationsToAppBoundDomains" value="true" />
    </platform>

    <!-- Misc permissions you may want in your app -->
    <platform name="ios">
        <config-file target="*-Info.plist" parent="NSCameraUsageDescription">
            <string>RYSE needs access to the camera to take pictures and scan barcodes</string>
        </config-file>
        <config-file target="*-Info.plist" parent="NSPhotoLibraryUsageDescription">
            <string>RYSE needs access to your photo library for you to select pictures to upload</string>
        </config-file>
        <config-file target="*-Info.plist" parent="NSLocationWhenInUseUsageDescription">
            <string>RYSE needs location access to help find things nearby</string>
        </config-file>
        <config-file target="*-Info.plist" parent="NSPhotoLibraryAddUsageDescription">
            <string>RYSE needs access to your photo library to save pictures there</string>
        </config-file>
        <config-file target="*-Info.plist" parent="NSMicrophoneUsageDescription">
            <string>RYSE needs access to your microphone to play audio during video streaming</string>
        </config-file>
    </platform>
...
Update your Cordova package.json scripts to make setup easy for other developers
Update our scripts so other developers can setup their local Cordova (platforms and plugins folders) more easily
"scripts": {
    "cordova": "cordova",
    "postinstall": "patch-package",
    "run:android": "cordova run android -d",
    "run:ios": "cordova run ios --debug -d",
    "run:ios:release": "cordova run ios --release -d",
    "setup": "npm install && npm run setup:ios && npm run setup:android",
    "setup:android": "cordova platform add android",
    "setup:ios": "cordova platform add ios"
  },
We will commit our package.json and patch files, so other developers can just run
cd cordova
npm run setup
npm run run:android
npm run run:ios
We can now successfully run our hosted React application inside of Cordova on both Android and iOS!
Hooray!!
We realize this doesn’t get you completely to the App Store with amazing functionality, but guess what?? We have 2 more follow up articles coming!
Push Notifications with Cordova + AWS Pinpoint (and APNS/Firebase setup)
Publishing your Cordova app to the Google Play Store and the App Store
As always, thanks for reading and staying curious!
Want to join the RYSE community?
Get the RYSE app:
Learn more about engineering at RYSE on our blog RYSE Engineering